


Disclosure: This content is reader-supported, which means if you click on some of our links that we may earn a commission.
Is it actually possible to make a living out of blogging? Or is it just a myth?
Here’s the good news: You CAN make money from blogging. You just have to do it right.
Take my blog as an example.
Blogging played a crucial role in my success. But reaching this point did have its fair share of obstacles, mistakes, and lessons.
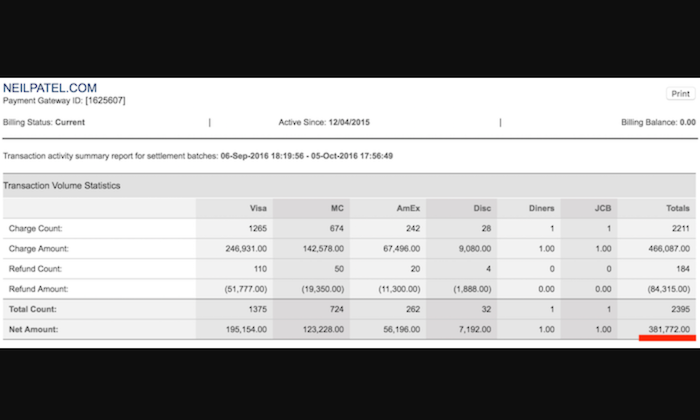
Currently, my revenue is $381,772 for 30 days.
Now, that’s a LOT of money, especially for a blog.
But how am I able to pull this off?
I was completely dedicated and put in tons of hard work to create useful and detailed content and use relevant images to provide accurate and thorough information to my readers.
This helped me become an authoritative figure and thought leader in my niche.
And no, it doesn’t have to take you years to become a successful blogger.
Knowing the art of consistently churning out top-quality content, driving search engine traffic, leveraging social media, and generating leads is great. But you also need to know how to make money from your blog.
The process is certainly challenging, especially with the internet painted with a lot of bad advice.
But this isn’t one of those articles.
In this guide, I’ll show you the exact way to make money from blogging by avoiding the mistakes I’d made in my 10-year journey. So not only will your blogging success be easier, but it also is quicker.
Excited? Let’s begin.
Your 2-Minute Cheat Sheet
The very first thing you need to start making money is to come up with an idea and the name for your blog. Think through the topics you’d want to write about often.
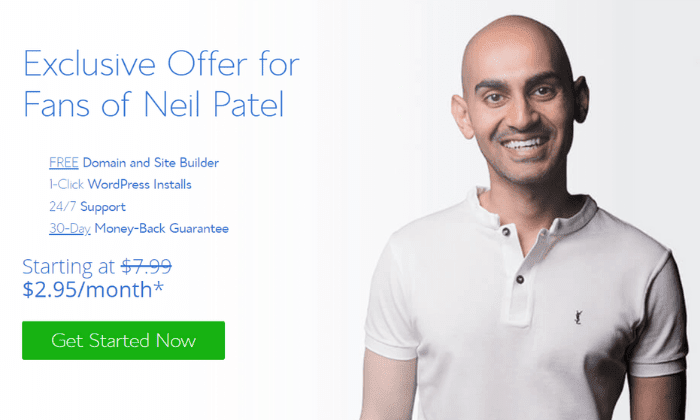
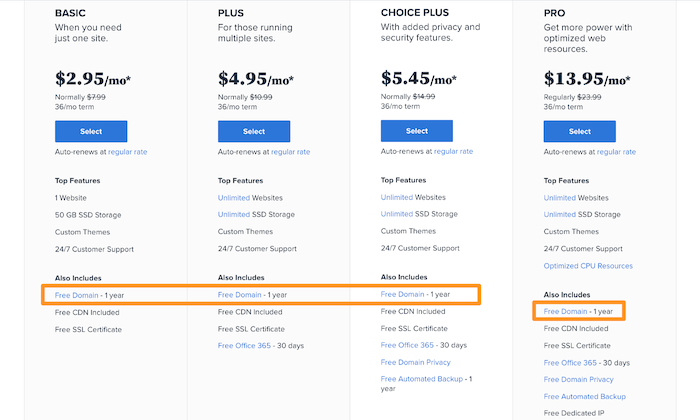
After that, sign up for the Basic plan with Bluehost. Even if you don’t have much of a budget, this is practically a steal at just $2.95 per month.
Set up your account, taking care to skip all the add-ons except for domain privacy and protection. A few extra dollars for better privacy and security is an investment.
And with this, you’ll have your own blog domain. Hurrah!
The next steps will have you installing WordPress and then finally writing and publishing your first blog post.
Once you’ve posted a couple of blogs and have started to attract some traffic, you can work on monetizing it to make your first dollars.
For this, you’ll have to sign up for a Google AdSense and Amazon Associates account to make money through ads and affiliate marketing, respectively. You can also sell your own products and services after successfully driving high traffic to your site.
That was the basics. Let’s get into the details now.
Step 1: Figure Out Your Blog’s Niche
The first on the agenda is to decide what your blog is going to be about. Whether you want to talk about marketing, CBD, veganism, or just random life stories, figure it out.
Remember, your idea doesn’t have to be revolutionary, but you do need a unique voice.
Here are two tips for deciding on a blog niche:
Choose Something That You Enjoy
I know that this sounds like a cliche, but it makes no sense to blog about it if you don’t love the topic.
Never start blogging about something that you don’t love–it will show in your writing and your readers will know. Moreover, you won’t be able to consistently produce top-notch content to build your audience and later monetize from it.
Make a list of things that get you naturally curious and that you enjoy learning about. Or think about what your friends and family come to you when seeking advice.
Find Out Whether a Prospective Niche Has a Readership
The only way you can earn money through your blog is if you have enough site visitors.
Let’s assume you’ve already figured out your blog niche and want to write about arts and crafts.
You make a smart decision to niche down further and develop a blog exclusively dedicated to either paper art or scrapbooking. While you enjoy writing about both topics, you prefer to focus on one primarily.
But how do you choose between the two options?
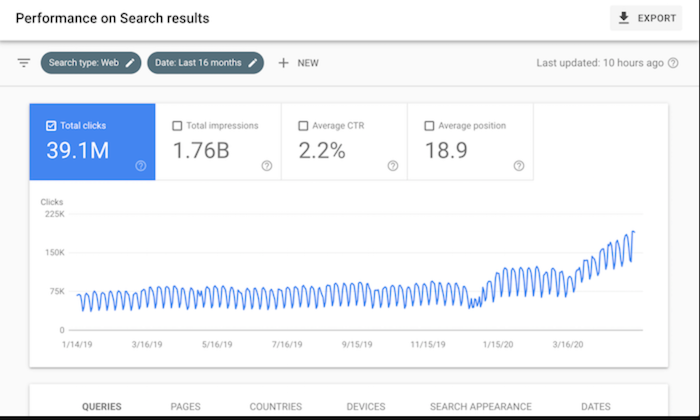
Answer: Do a quick Google search.
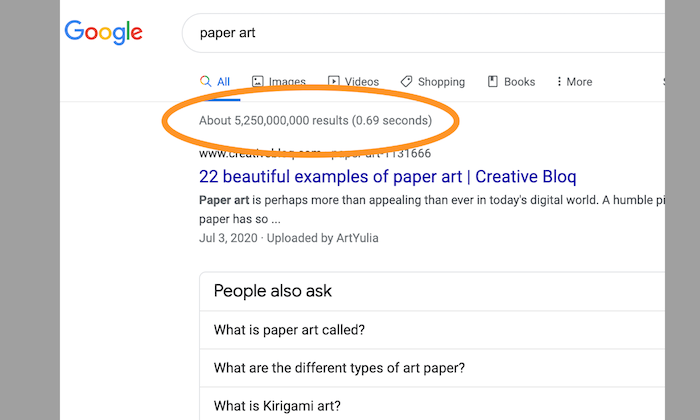
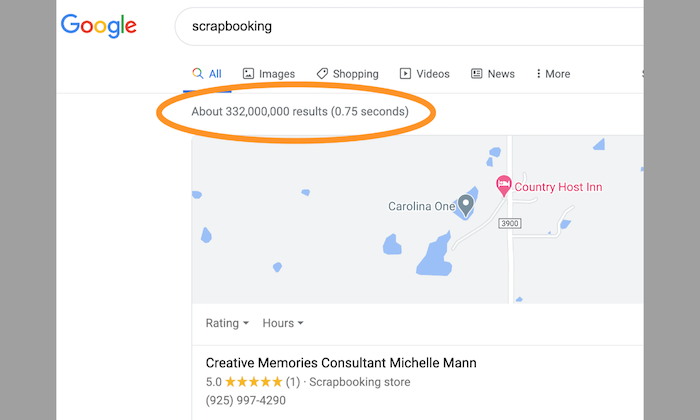
As you can see, there are far more results related to paper art as opposed to scrapbooking. Therefore, it makes more sense to write about paper art, which is what audiences are searching for.
I would also like to add that it’s better to avoid broad or generic topics. Don’t be afraid to get specific as long as you have takers for it.
For instance, if you want to create a food blog, don’t use words like “food.” Instead, use “barbecue” or “vegan.”
Get my point?
Step 2: Name Your Blog
Once an idea is in place, you need to work on naming your blog.
Does the name Stefani Joanne Angelina Germanotta ring a bell? Thought so.
But I bet Lady Gaga does.
Stefani Joanne Angelina Germanotta is Lady Gaga’s real name. She decided to go with a catchier and easier-to-remember alternative that aligns better with her music.

That’s the power of the right name.
Choosing a blog name is equal parts exciting and daunting. After all, this will be your brand name and dictate how people will remember you.
Don’t overthink it, and don’t name your blog something random or offensive.
Keep in mind the following questions when deciding on a name:
- Does it reflect what your blog is going to be about?
- Would your target audience like it?
- Is the name easy to say and spell?
- Is it short and concise?
I chose my own name as my domain (NeilPatel.com) simply because Neil Patel is who I am, and it’s also my brand. You could do what I did or come up with something entirely different.
Whatever name you come up with, make sure it’s available as website domains.
You can use Bluehost’s domain name checker for this purpose. Type in each potential name in the search bar, and click Check Availability to know.
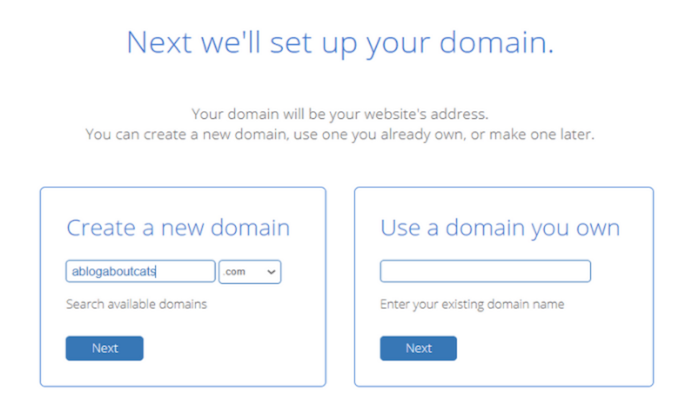
I’d recommend opting for a .com whenever possible.
Don’t buy an available domain at this point. I have something up my sleeve to help you get it for free.
Step 3: Sign up With a Web Host Like Bluehost
You need to sign up for a web hosting service to get your blog live, along with a registered domain name that will serve as your blog’s address.
I recommend Bluehost as its hands down one of the best web hosting companies—not to mention affordable—that assures excellent service and a free domain.
And did I mention that as a NeilPatel.com reader, you get an additional discount?
You’re welcome.
Head over to Bluehost.com, and click on the green Get Started Now button.
Next, sign up for the Basic plan. You can always upgrade later, but since you’re just starting a blog, it’s better to stick to the Basic plan.
Register the domain name you came up with without having to pay anything extra. Just make sure the drop-down is set to .com before you click Next.
Following this, you need to sign in using your Google account. You can also manually enter your personal credentials.
Scroll down to choose your registration term, which can either be a 36-month, a 24-month, or a 12-month agreement. To get the best deal ($2.95 per month), you’ll have to sign up for a three-year contract.
It still isn’t over yet.
You’ll find package options like Domain Privacy + Protection, Codeguard Basic, Bluehost SEO Tools, Microsoft 365 Mailbox Trial, and SiteLock Security Essentials.
In my opinion, you only need Domain Privacy + Protection to protect your contact information against scam callers and unsolicited emails. Ignore the others.
Finally, enter your payment information, read the terms and conditions, and hit submit.
This is the point where you’ll have your blog!
Complete all the remaining instructions to set up your account, and then move onto the next step.
Step 4: Install WordPress CMS
You have your web host, next you need blogging software.
I trust WordPress to run all my blogs as it is user-friendly, feature-rich, and free. Plus, you can install thousands of free plugins to make your blog more functional and customize it however you want.
After signing up for Bluehost, you will have a free domain and hosting account. Log in by filling in your credentials and then click on Install WordPress.
Next, select Do it yourself (FREE) and hit Install, followed by Check Domain. Lastly, acknowledge WordPress’s terms of service and finalize your install.
Ta-Da! You now have a fully functional WordPress blog ready to roll.
Step 5: Design Your WordPress Blog
To design a blog, you need to select an attractive and affordable WordPress theme.
Why do you need this? Well, after signing up for WordPress, your blog will look something like this:
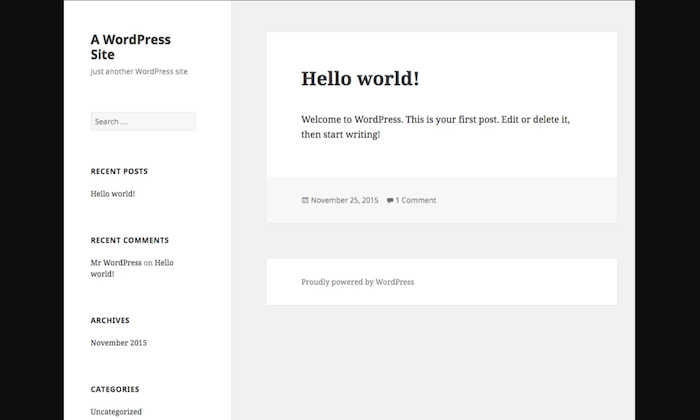
Not exactly what you’d call sleek and welcoming, right? The way your website looks can help drive more website traffic, which, in turn, will enable you to make more money.
Luckily, WordPress has thousands and thousands of themes for you to choose from. I’ve even done a roundup of some of the best ones. Here’s how you can select a WordPress theme:
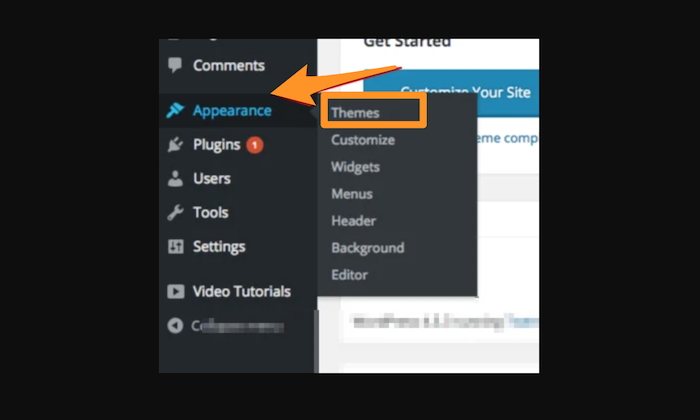
- Log into your WordPress account.
- Click on Appearance in the sidebar menu on your dashboard.
- From the drop-down options, select Themes.
- Go to Add New, located at the very top of the screen, to gain access to thousands of fancy WordPress themes. You can also click on Feature Filter to filter your search to see options more suited to your tastes.
You should choose a theme that fits your personal style, but at the same time, it should also be in sync with your blog niche.
- Preview the theme to see what it will look like.
- If you like the sneak peek of a specific theme, click on Install and then Activate.
With a nice new theme, your website will get a much-needed upgrade that makes it look appealing to visitors.
Step 6: Come up With Interesting Blog Topics
If you want to increase your website traffic or encourage more email signups, you need to offer your readers interesting content.
My tip is to make a list of questions you get often. Trust me, within just 30 minutes, you’ll be able to come up with a bunch of potential blog topics. Your priority should be to look at things from your reader’s viewpoint.
You can also focus on higher-level questions.
Suppose you want to start a parenting blog for stay-at-home moms. Below, I’ve created a list of questions to ask yourself, along with a list of answers concerning the mom blog.
Q1) What could be an intriguing or exciting talking point for your readers?
For stay-at-home moms, topics related to sleep training, homeschooling, and budget-friendly meal ideas could be a great place to start.
Q2) What are your reader’s pain points and challenges?
Common household challenges for stay-at-home moms could be meal planning, understanding developmental milestones, and so on.
Q3) What are your readers’ character traits?
Moms are typically patient and caring and appreciate a sense of humor.
Q4) What niche topics would appeal the most to your readers?
A child’s mental, physical, and emotional development could be attractive talk points for stay-at-home moms.
Q5) What topics would your readers hate about my niche?
Stay-at-home moms don’t like to be looked down on by others. So, you could write blogs about how society views them and their impact.
Similarly, you can use the above questions to come up with ideas according to your niche. While you’re at it, don’t forget to work out a catchy headline that will make the reader instantly click on your blog.
Step 7: Optimize Your Blogs for the SERPs
Search engine optimization or SEO is a crucial step to earn money via blogging. Here, you will optimize your website to rank higher in search engines for specific keywords and phrases.
If you’ve been following me for a long time, you may already know how SEO is my trump card.
By incorporating particular keywords and phrases, I’ve successfully driven more than 30 million visitors to my website. Shocked?
That’s the power of SEO.
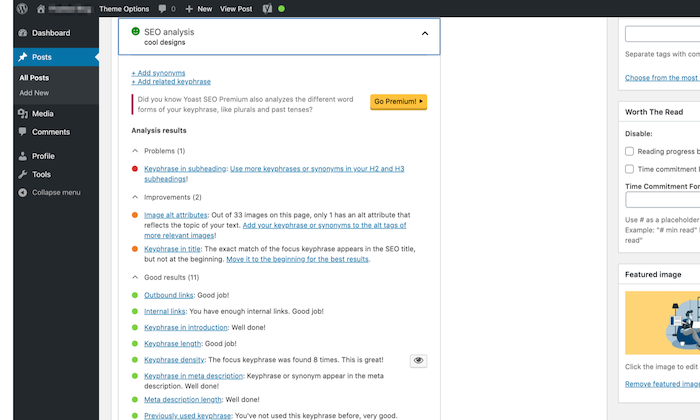
On WordPress, you can optimize your content and blog by downloading a plugin called Yoast SEO.
Go to the Plugins menu, and click on Add New. Search for Yoast SEO in the search bar, and then install the plugin.
Don’t forget to activate it to complete the installation process.
You’ll find that this plugin will give you all kinds of improvement tips and suggestions based on the keyword you select to help you optimize your content. I’d recommend incorporating as many suggestions as you can to improve SEO and content readability.
Step 8: Sign up for Google AdSense
Setting up ads is the best way to monetize your blog. But you need to be smart about it.
The biggest mistake people make is to bombard their sites with blinking ads. Avoid this at all costs.
Instead, focus on using targeted ads that appeal to your customers without annoying them.
To start earning money through ads, you need a Google AdSense account. Head over to the AdSense page, and click on Sign Up Now. If you don’t have an existing Google account, you have to set up a new one. If you already have a Google account, simply sign in.
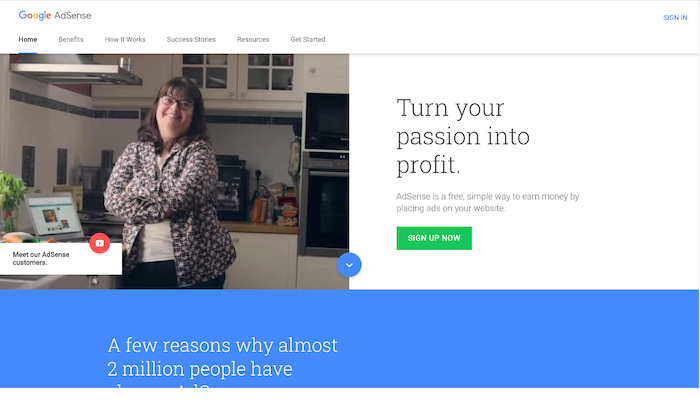
Fill out all the relevant information before submitting your application. The AdSense team reviews every application, and if everything goes well, you’ll be in!
Next, follow the below steps to set up your account:
- Go to your AdSense dashboard and click on My Ads > New ad unit.
- Select the size of your ad and the type of ad. Once you’re done, select Save and get code.
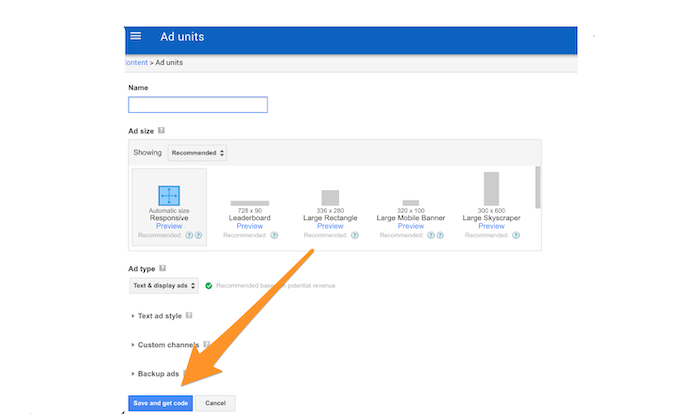
- You’ll get a bit of code that you’ll then have to copy and paste between your page’s <body> tags. Here’s how it’ll look.
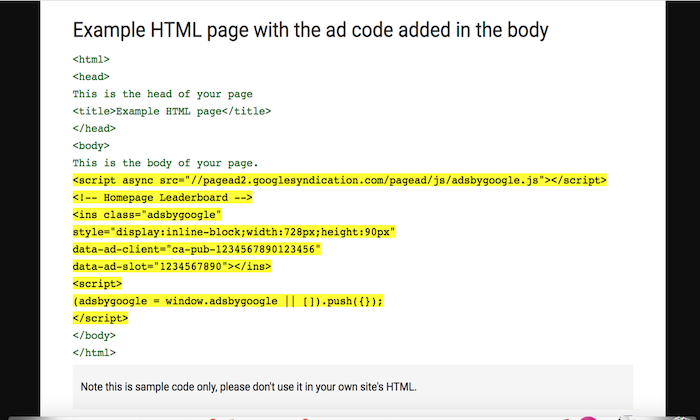
- Once you’ve pasted the code, your ad will be live. Your AdSense dashboard will have all information about your earnings, so check it regularly.
While you can use ads on as many as you want, I would recommend starting with just one–maybe two max–to get an idea of how your audience responds to them.
If you see a higher bounce rate on your dashboard, you should consider repositioning your current ads for better results.
Step 9: Create an Amazon Associates Account
You might have already heard of affiliate marketing. If your goal is to earn passive income, leveraging the power of affiliates is your best bet.
You can start by signing up for Amazon Associates, which allows you to start earning right away through referral links, display ads, or Amazon-based shopping carts.
If your visitors decide to use your referral link or click on the display ads, you’ll get a small commission.
To sign up for Amazon Associates, all you need to do is visit the website and click on Join Now for Free.
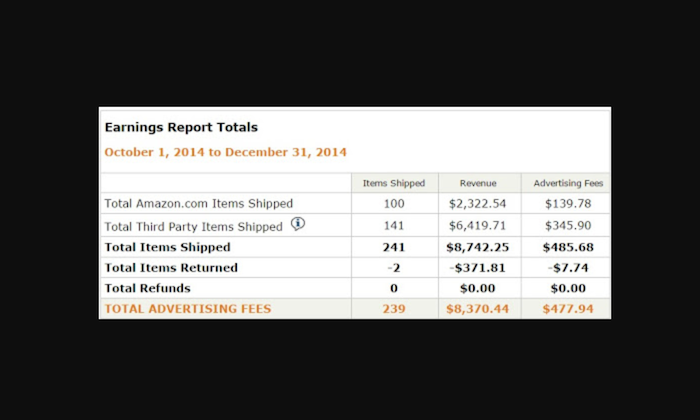
This can be pretty effective. Just check out these earnings of Brendan Mace for definitive proof.
Amazon Associates isn’t the only affiliate program.
You’ll be happy to know that there are plenty of companies with their own affiliate programs, some of which pay higher commissions than Amazon. Just make sure to research before signing up to be an affiliate for a brand.
That said, I’d also like to emphasize the importance of advertising only those products or services that you’ve used yourself or genuinely believe can help your audience.
Step 10: Offer a Product or Service for Sale (Optional)
Many people think that advertisements are the only source of income for bloggers. This might be true for a few, but you’ll also find many bloggers make quite a bit of money by selling a product or service.
Of course, this will only work when you already have a loyal readership with steady website traffic like Nomadic Matt. Once you’re at this stage, you shouldn’t be afraid to take the leap.
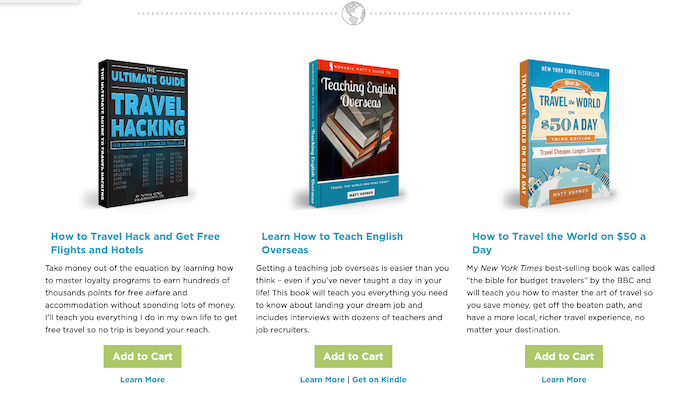
Here are a few things that you can consider selling:
- Training courses
- Books
- Video courses/webinars
- Coaching services
- Consulting services
Next, you have to figure out how you want to sell your product. Services like Shopify or WooCommerce plugins on WordPress, Amazon, or Etsy are great options for digital products. If you’re selling a physical product (like phone cases or clothes), you’ll have to set up a more comprehensive ecommerce store.
Finally, let your audience know about your product or service by sending them emails. You can also consider developing lead magnets like pre-recorded webinars, PDFs, and whitepapers to build your email list.
Conclusion
There’s a difference between simply having a blog and monetizing a blog. To make this transition successful, you’ll need to adopt a more proactive and focused approach.
You’ve got this!
Just remain focused and work consistently to keep improving your blog and build trust between you and your audience. And follow my steps above to get things started on the right track.
Remember to stick with what works, and you’ll have a successful formula.
Have you tried blogging yet? Let me know about your experience.
The post How to Make Money Blogging appeared first on Neil Patel.
source https://neilpatel.com/blog/how-to-make-money-blogging/