

There are a lot of tools out there and a ton of SEO reports.
But when you use them, what happens?
You get lost, right?
Don’t worry, that’s normal (sadly). And maybe one day I will
be able to fix that.
But for now, the next best thing I can do is teach you how to grow your SEO traffic using Ubersuggest. This way, you know exactly what to do, even if you have never done any SEO.
Here we go…
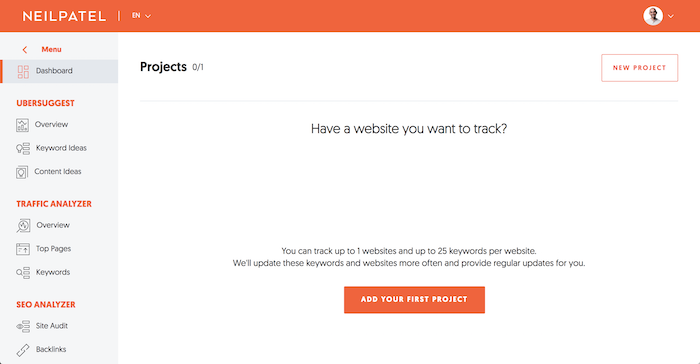
Step #1: Create a project
Head over to the Ubersuggest dashboard and
register for a free account.
Once you do that, I want you to click on “Add Your First Project.”
Next, add your URL and the name of your website.

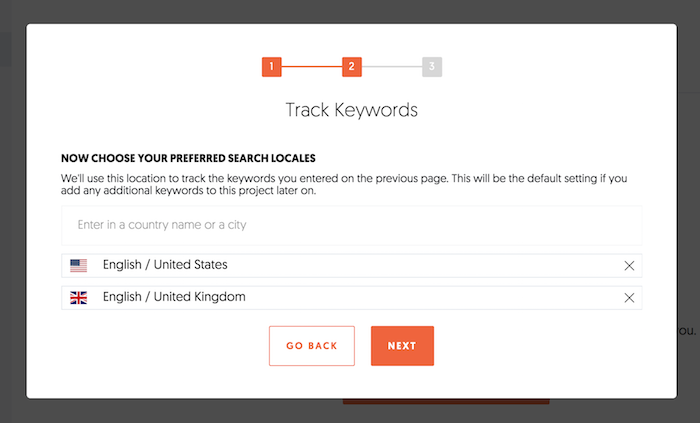
Then pick the main country or city that you do business in. If you are a national business, then type in the country you are in. If you are a local business, type in your city and click “Next.”
If you do business in multiple countries or cities, you can type them in one at a time and select each country or city.
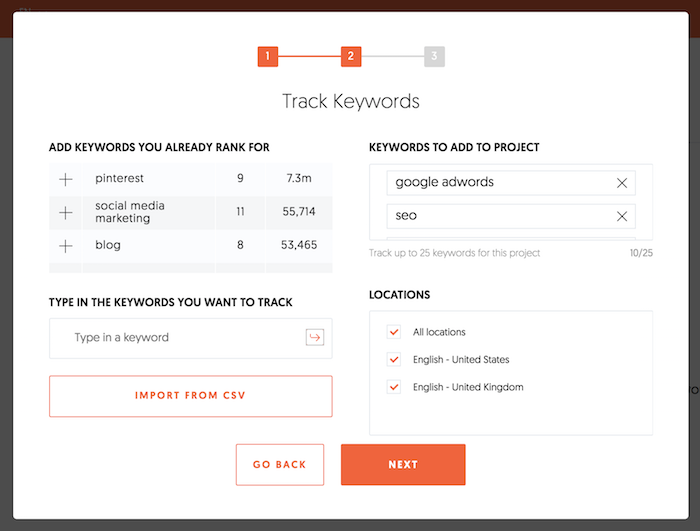
Assuming you have your site connected to Google Search Console, you’ll see a list of keywords that you can automatically track on the left-hand side. Aside from tracking any of those, you can track others as well. Just type in the keywords you want to track in the box and hit the “Enter” key.
After hitting the “Next” button, you will be taken to your dashboard. It may take a minute but your dashboard will look something like this:
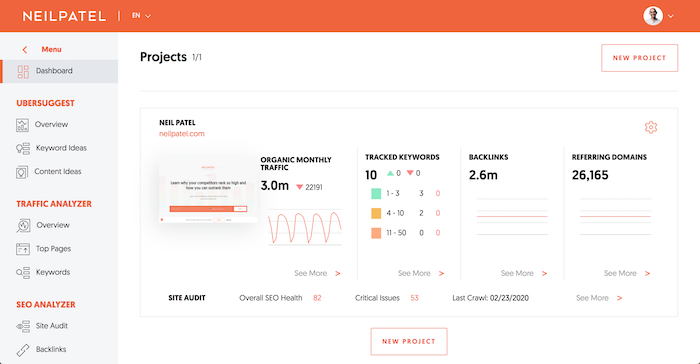
Click on the “Tracked Keywords” box and load your website profile.
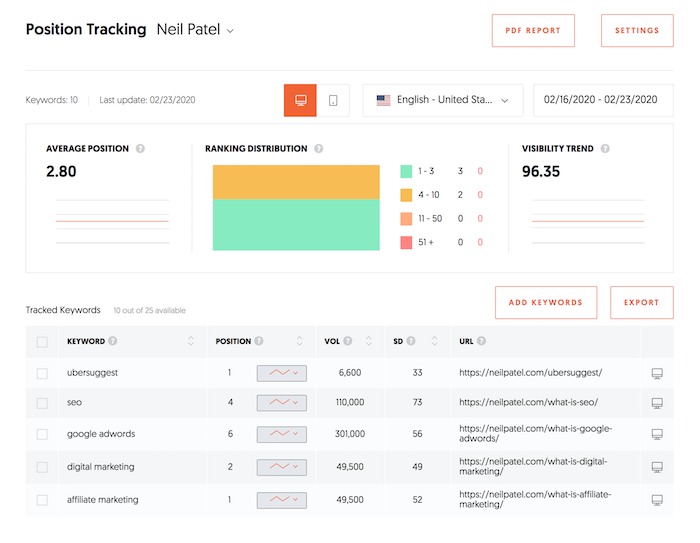
What’s cool about this report is that you can see your rankings
over time both on mobile and desktop devices. This is important because Google
has a mobile index, which means your rankings are probably slightly different
on mobile devices than desktop.
If you want to see how you are ranking on Google’s mobile index, you just have to click the “Mobile” icon.

The report is self-explanatory. It shows your rankings over time for any keyword you are tracking. You can always add more keywords and even switch between locations.
For example, as of writing this blog post, I rank number 4 on desktop devices for the term “SEO” in the United States. In the United Kingdom, though, I rank number 16. Looks like I need to work on that. ?
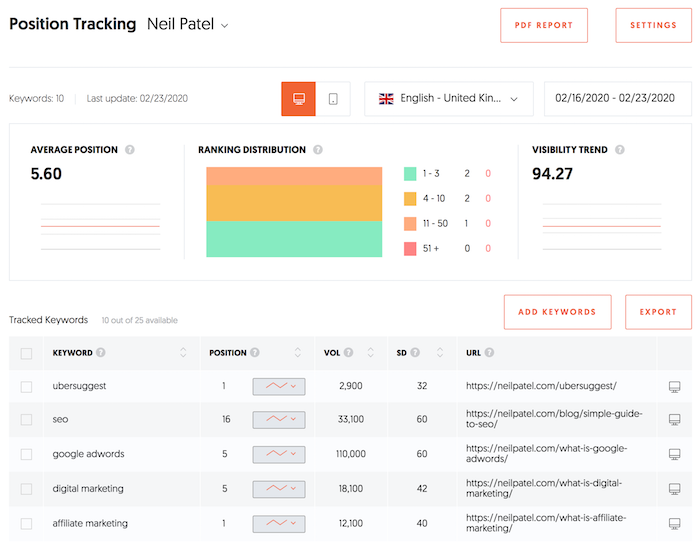
What’s cool about this report is you can drill down on any
keyword and track your rankings over time. For example, here’s what my site
looks like now…
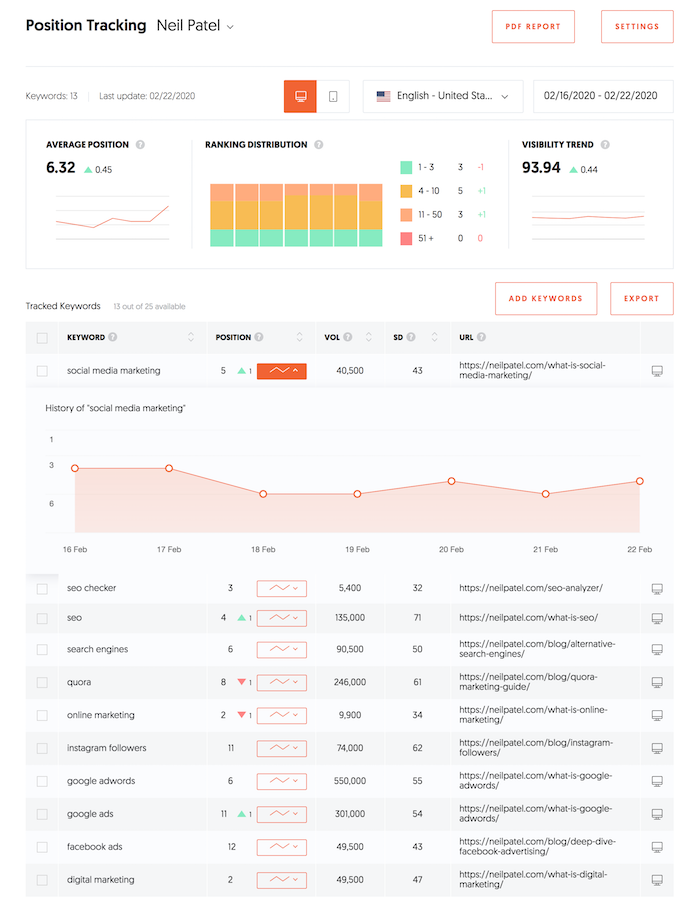
The purpose of this report is to track your SEO progress. If you are heading in the right direction, your rankings should be going up over time.
Sure, some weeks your rankings will be up and other weeks it
will be down, but over time you should see them climb.
Step #2: Fixing your SEO errors
Once you have created your first project, it’s time to improve your rankings.
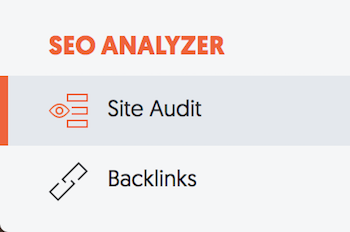
Let’s first start off by going to the “Site Audit” report. In the navigation, click on the “Site Audit” button.
Once you are there, type in your URL and click the “Search” button.
It can take a few minutes to run the report, but once it is
done it will look something like this.
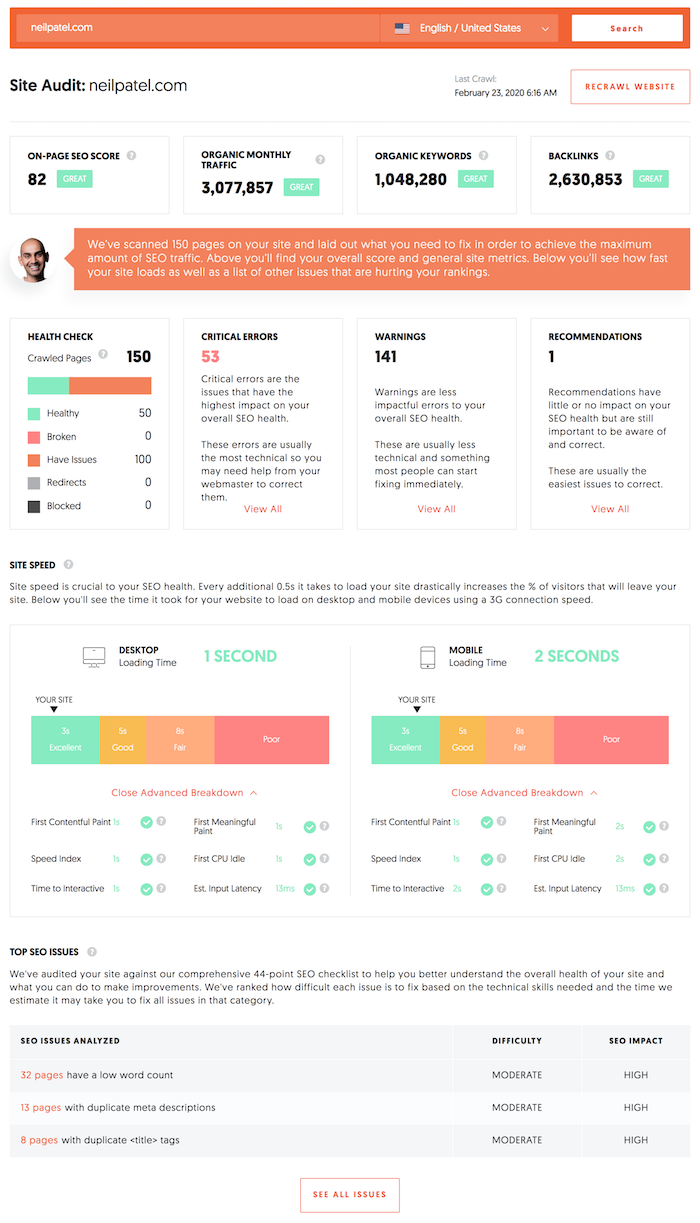
Your goal is to optimize your site for as high as an SEO score as possible. Ideally, you want to be reaching for 90 or higher.
Keep in mind that as you add more pages to your site and it gets bigger, it will be increasingly harder to achieve a 90+ score. So, for sites that have more than a few hundred pages, shoot for a score that is at least 80.
As you can see above, I’m getting close to the 80 mark, so I’ll have to get my team to go in and fix some of my errors and warnings.
When looking at this report, you’ll want to fix your critical errors first, then your warnings if you have time. Eventually, you want to consider fixing the recommendations as well.
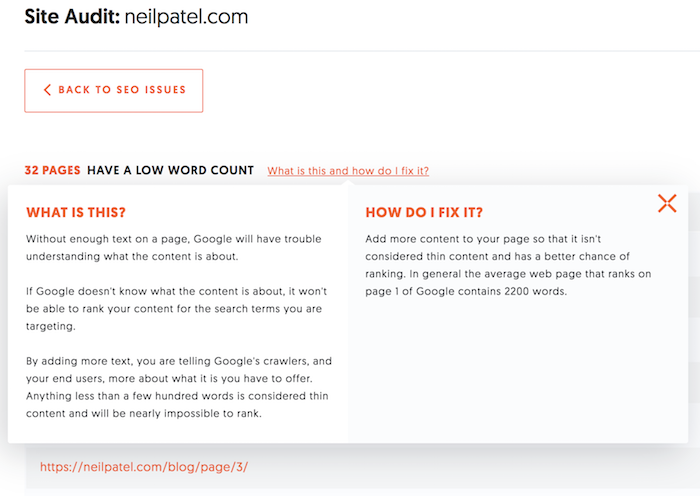
Click on “Critical Errors” if you have any. If not, click on the Warnings” option. You’ll see a report that looks something like this:
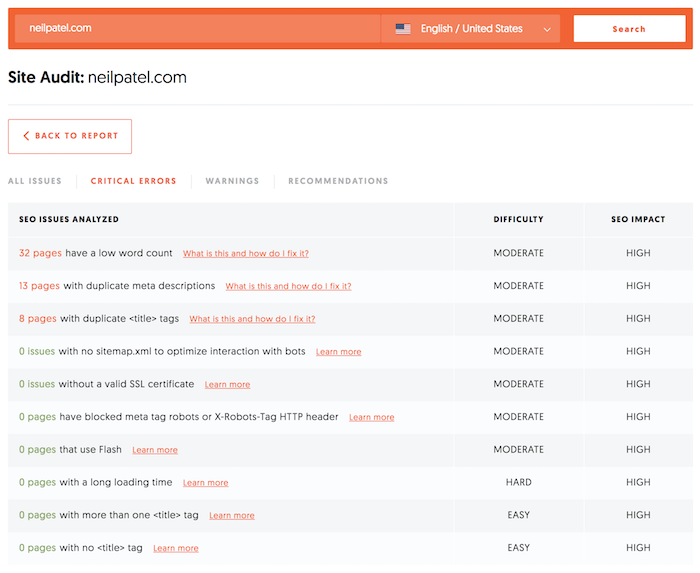
Your errors are probably going to be different than mine, but your report will look similar.
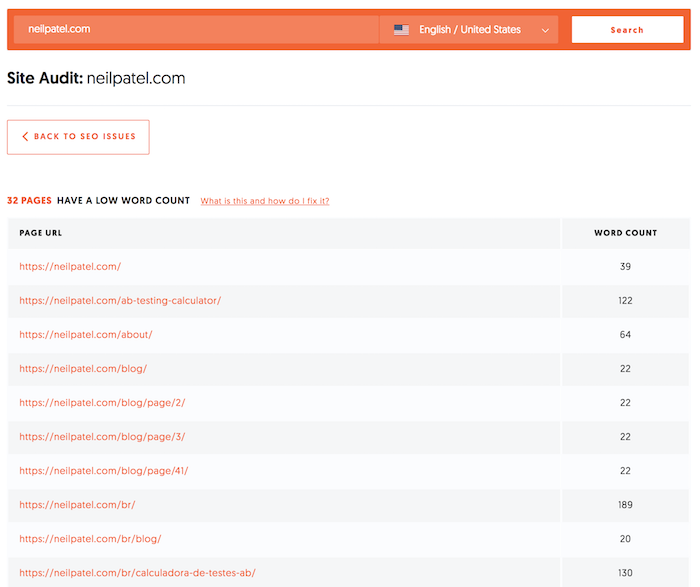
Click through on the first issue on the report and work your way down. The report sorts the results based on impact. The ones at the top should be fixed first as they will have the highest chance of making an impact on your traffic.
If you aren’t sure of what to do or how to fix the issue, just click on the “What Is This” and “How Do I Fix It” prompts.
Again, you will want to do this for all of your critical
errors and warnings.
Once you do that, go back to the “Site Audit” report and scroll down to where you see your site speed results.
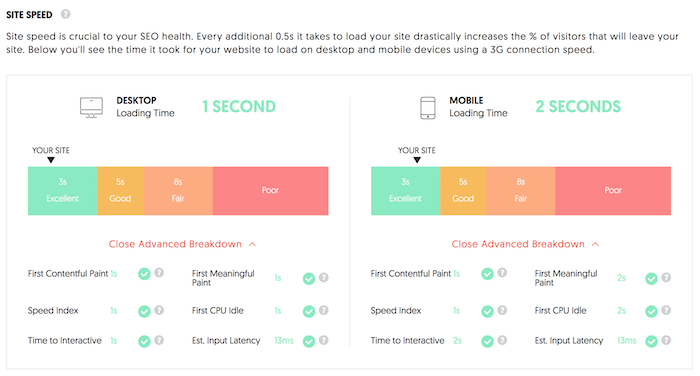
Your goal should be to get an “Excellent” ranking for both mobile and desktop devices. If you are struggling to do this, check out Pagespeed Insights by Google as it will give you a detailed explanation of what to fix.
If you are like me, you probably will need someone to help
you out with this. You can always find a developer from Upwork and pay them 50 to 100 dollars to fix
your issues.
After you fix your errors, you’ll want to double-check to make sure you did them right. Click on the “Recrawl Website” button to have Ubersuggest recrawl your site and double-check that the errors were fixed correctly.

It will take a bit for Ubersuggest to recrawl your website
as it is going through all of your code again.
Step #3: Competitor analysis
By now you have probably heard the saying that “content is king.”
In theory, the more content you have, the more keywords you will have on your site and the higher the chance that you’ll rank on Google for more terms.
Of course, the content needs to be of high quality and people have to be interested in that topic. If you write about stuff that no one wants to read about, then you won’t get any traffic.
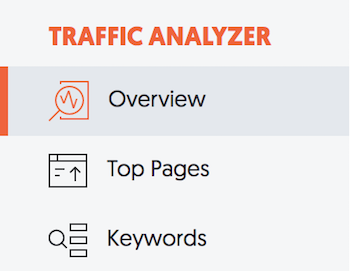
Now, I want you to go to the “Traffic Analyzer Overview” report.
Put in a competitor’s URL and you will see a report that
looks something like this.
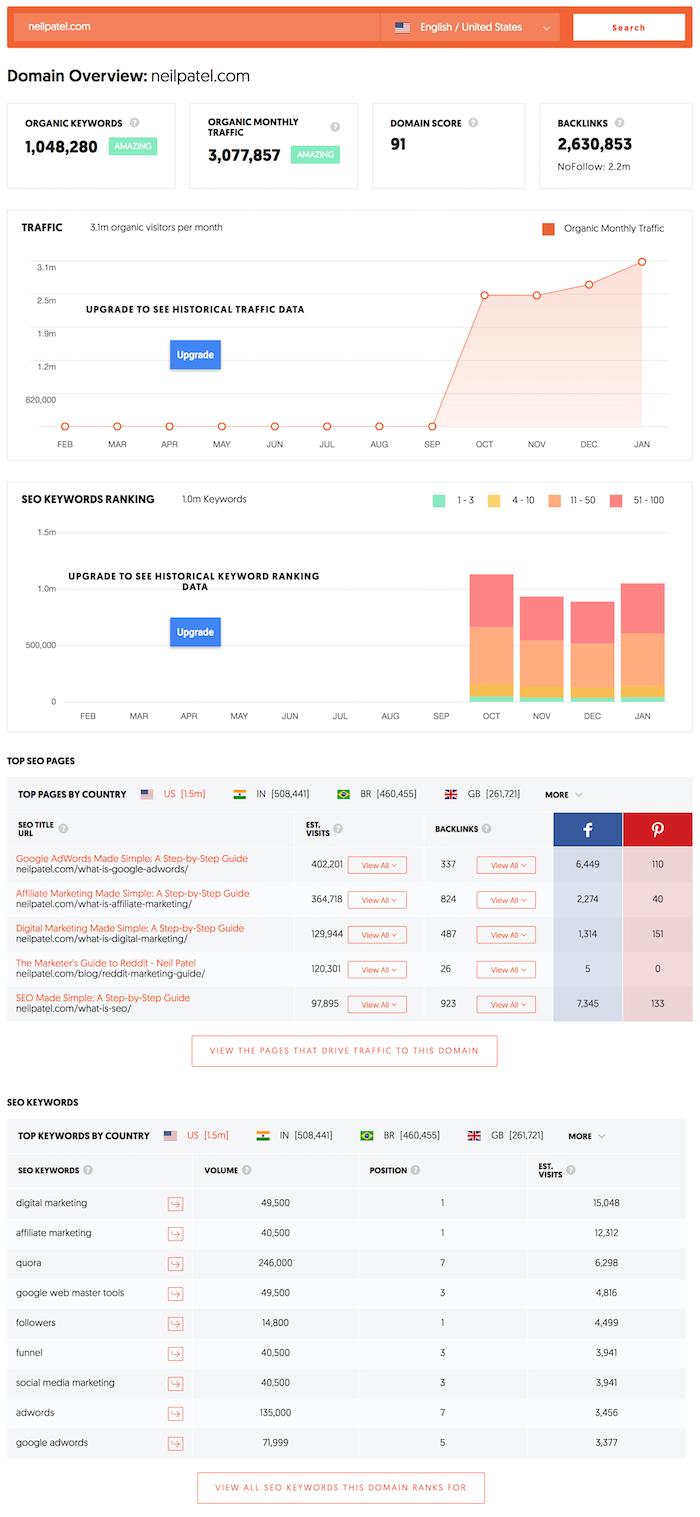
This report shows the estimated monthly visitors your competition is receiving from search engines, how many keywords they are ranking for on page 1 of Google, their top pages, every major keyword they rank for, and the estimated traffic each keyword drives to their site.
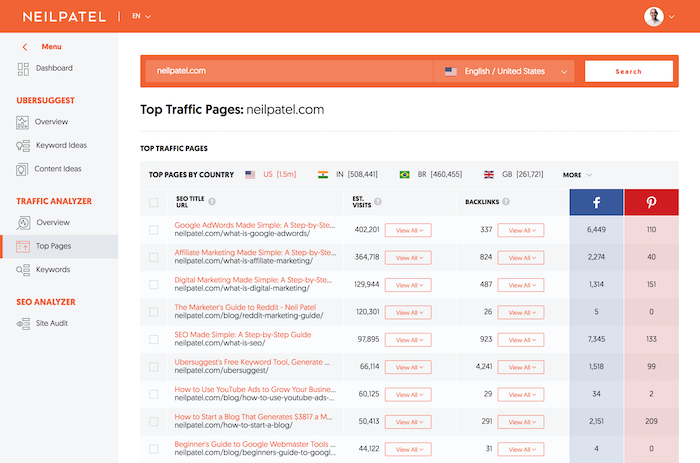
I want you to go to the “Top Pages” section and click the button that says “View The Pages That Drive Traffic To This Domain.”
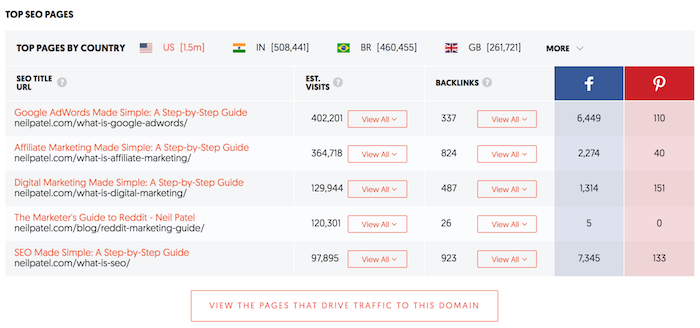
You’ll be taken to the “Top Pages” report.
Here, you will see a list of pages that your competition has on their site. The ones at top are their most popular pages and as you go down the list you’ll find pages that get less and less traffic.
Now I want you to click “View All” under “Estimated Visits” for the top page on your competition’s site.
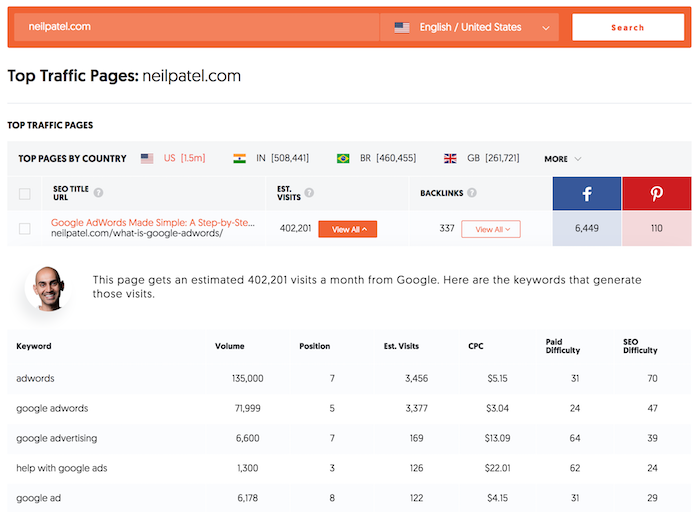
These are the keywords that the page ranks for.
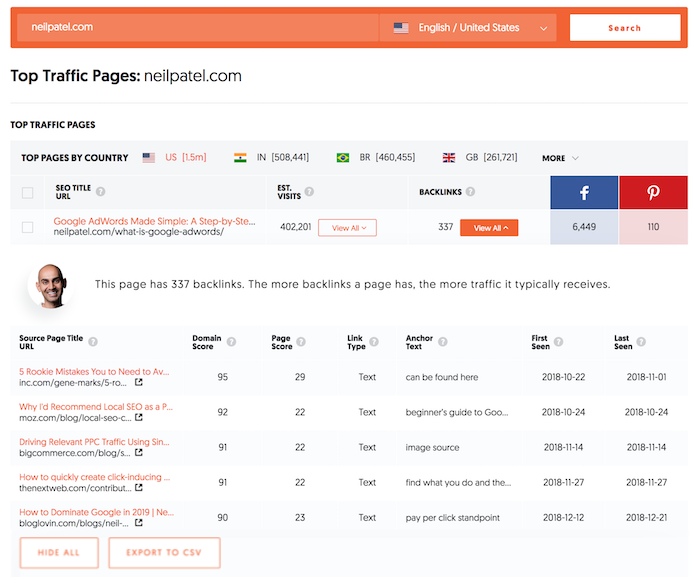
And you’ll also want to click “View All” under links to see who links to your competition.
Save that list by exporting the results (just click the export button) or by copying them.
I want you to repeat this process for the top 10 to 20 pages for each of your main competitors. It will give you an idea of the keywords that they are going after that drive them traffic.
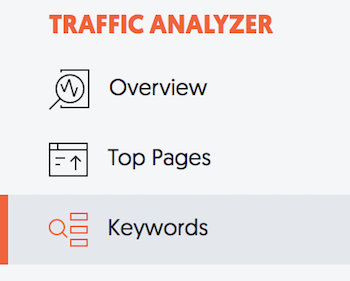
Next, I want you to click on the “Keywords” navigation link under the “Traffic Analyzer” heading.
You’ll see a list of all of the keywords your competitor ranks for and how much traffic they are getting for those keywords.
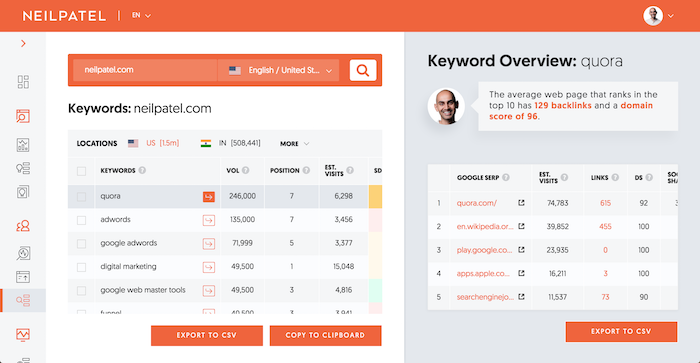
This list will give you an idea of the keywords that your
competition is targeting.
Now, by combining the data you saw from the “Top Pages” report and the data you got from the “Keywords” report, you’ll now have a good understanding of the type of keywords that are driving your competition traffic.
I want you to take some of those keywords and come up with
your own blog post ideas.
Step #4: Come up with blog post ideas
You can come up with ideas to blog on using a few simple
reports in Ubersuggest.
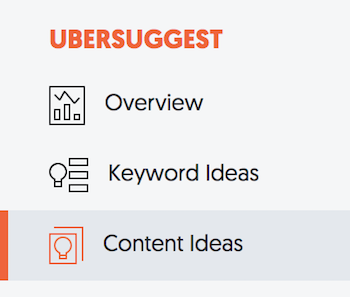
The first is the “Content Ideas” report. In the navigation bar, click on the “Content Ideas” button.
I want you to type in one of the keywords your competition
is ranking for that you also want to rank for.
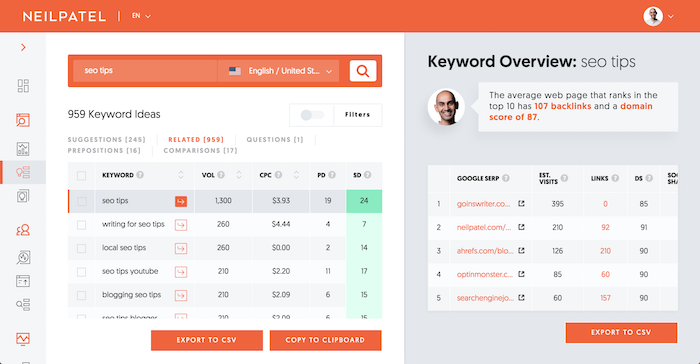
For example, I rank for “SEO tips.” If you want to rank for that term, you would type that into the content ideas report and hit the “Search” button.
You’ll then see a list of blog posts that have done well on that topic based on social shares, backlinks, and estimated visits.
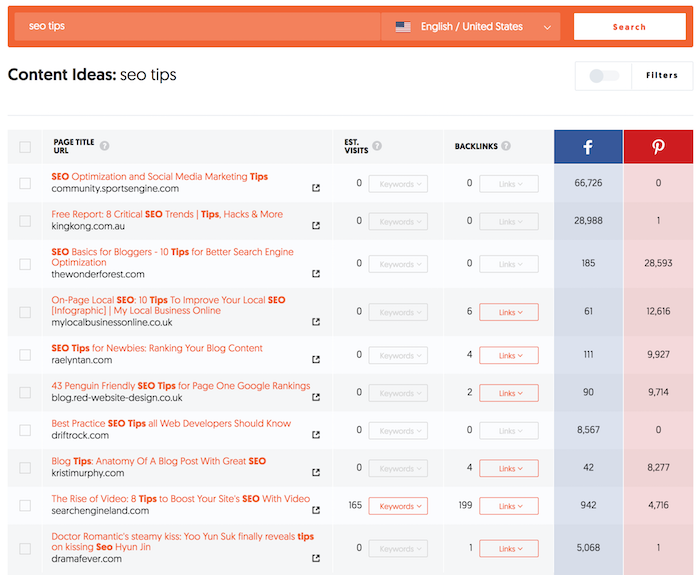
It takes some digging to find good topics because ideally, a post should have all 3: social shares, backlinks, and estimated visits.
When you find a good one, click “View All” under “Estimated Visits” to see the keywords that the post ranks for.
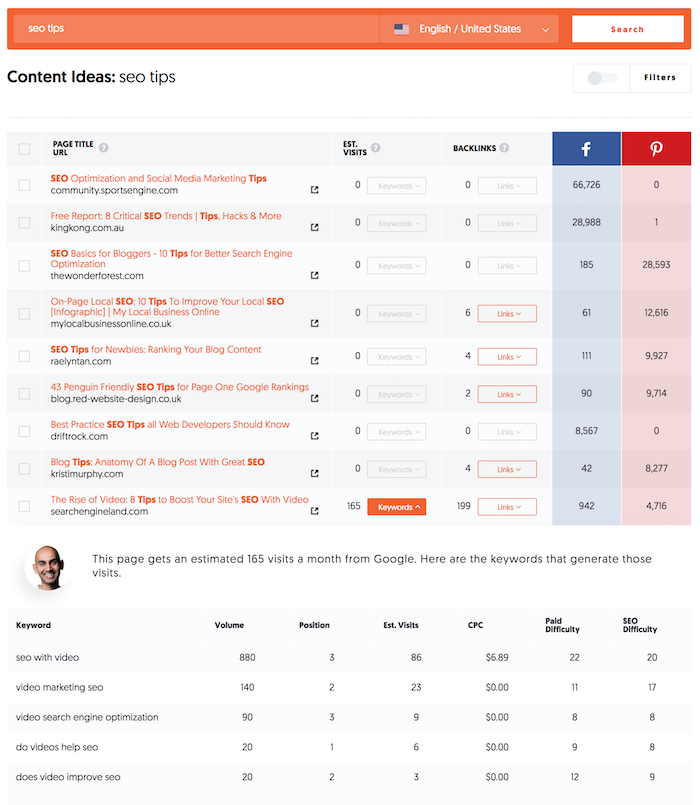
If you write a similar post, you’ll want to make sure you include these keywords.
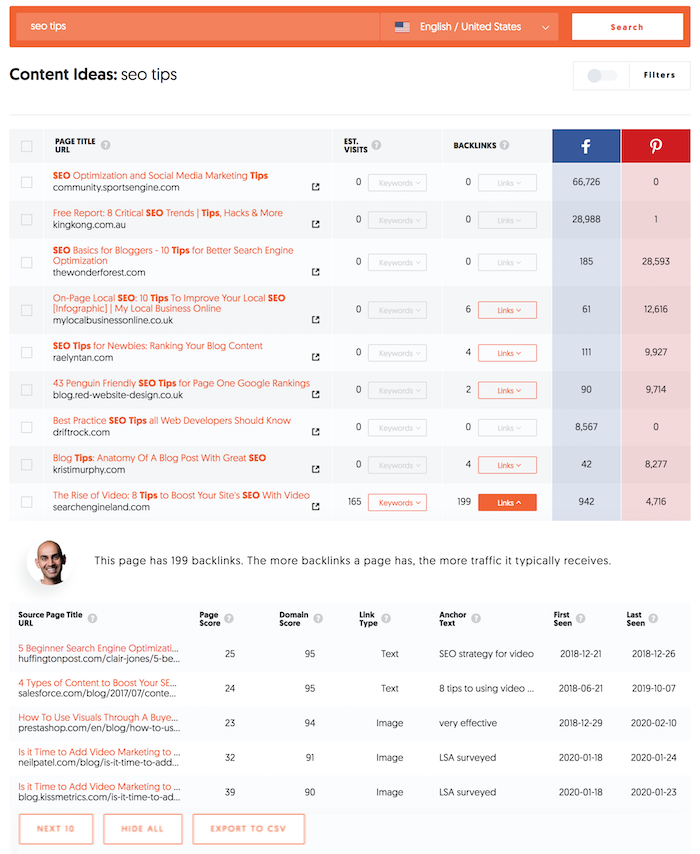
And you’ll want to click “View All” under links to see who links to your competition. Keep track of this as you will use it later. You can do this by copying the list or by clicking on the export button.
You can also get more ideas by going to the keyword ideas report. So, in the navigation bar, click on the “Keyword Ideas” button.
From there, type in keywords related to what your competition ranks for and you will see a list of long-tail suggestions that are similar.
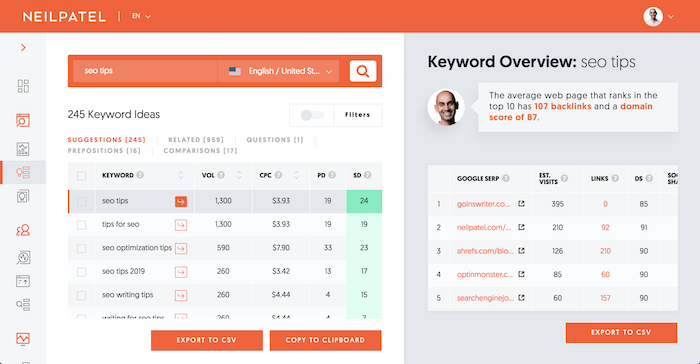
You can also click on the “Related” link in that report to see a bigger list of related keywords.
And you can click on “Questions,” “Prepositions,” and “Comparisons” to see even more keyword and blog post ideas.
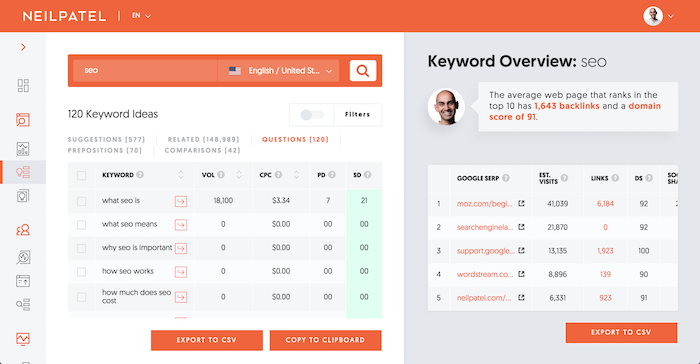
Typically, the more search volume a keyword has the more
traffic you’ll get when you write about it.
Now that you have a list of keywords and topic ideas, it’s time for you to write and publish your content.
If you are new to writing blog posts, watch the video below. It breaks down my writing process.
Step #5: Promotion
I wish SEO was as simple as fixing errors and writing content based on popular keywords but it isn’t.
Remember how I had you create a list of sites that link to your competition?
You know, the ones you got from the “Top Pages” and “Content Ideas” reports.
I want you to start emailing each of the sites linking to your competition and ask them to link to you. See if someone else is linking to your competition. If they are, it shows you that they don’t mind linking to sites in your space. This means that there is a good chance you can convince them to link to you as well.
You’ll have to browse around their site to find their email. But once you do, send off a personal message explaining why your content will provide value to their readers and how it is different/better than what they are currently linking to.
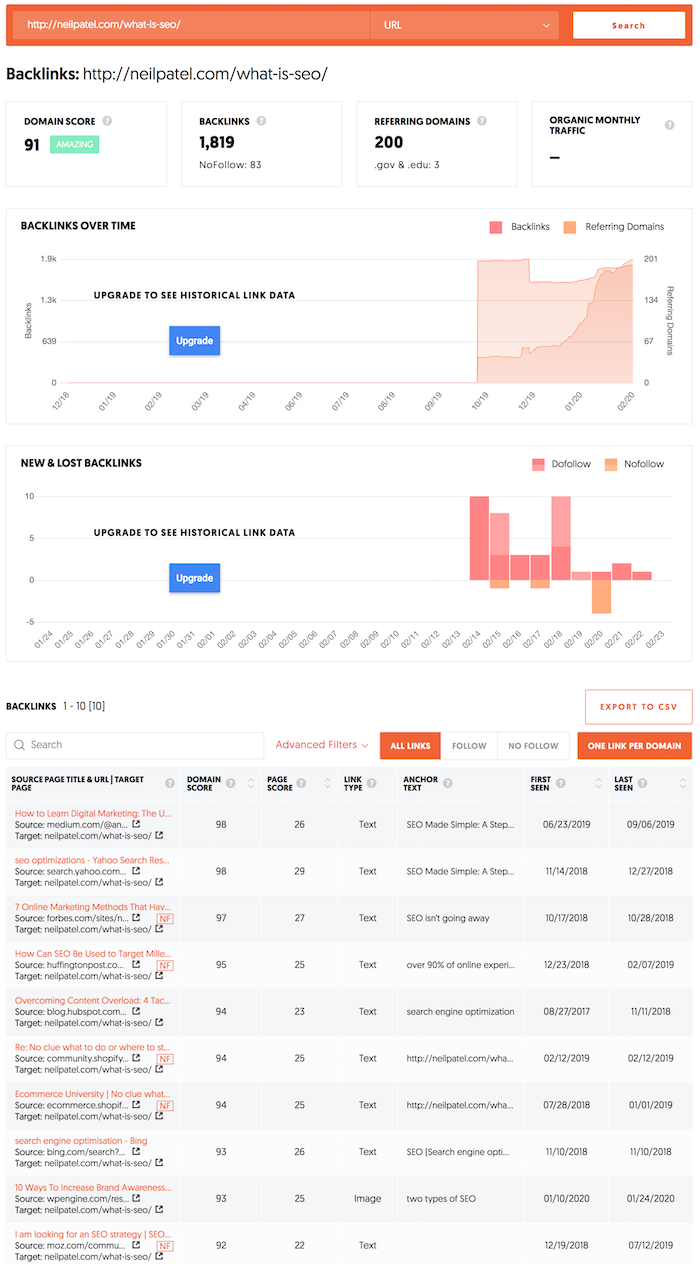
In addition to that, I want you to go to the “Backlinks” report. In the navigation bar, click on the “Backlinks” option.
In this report, I want you to type in your competitor’s domain. You’ll see a report that looks like this:
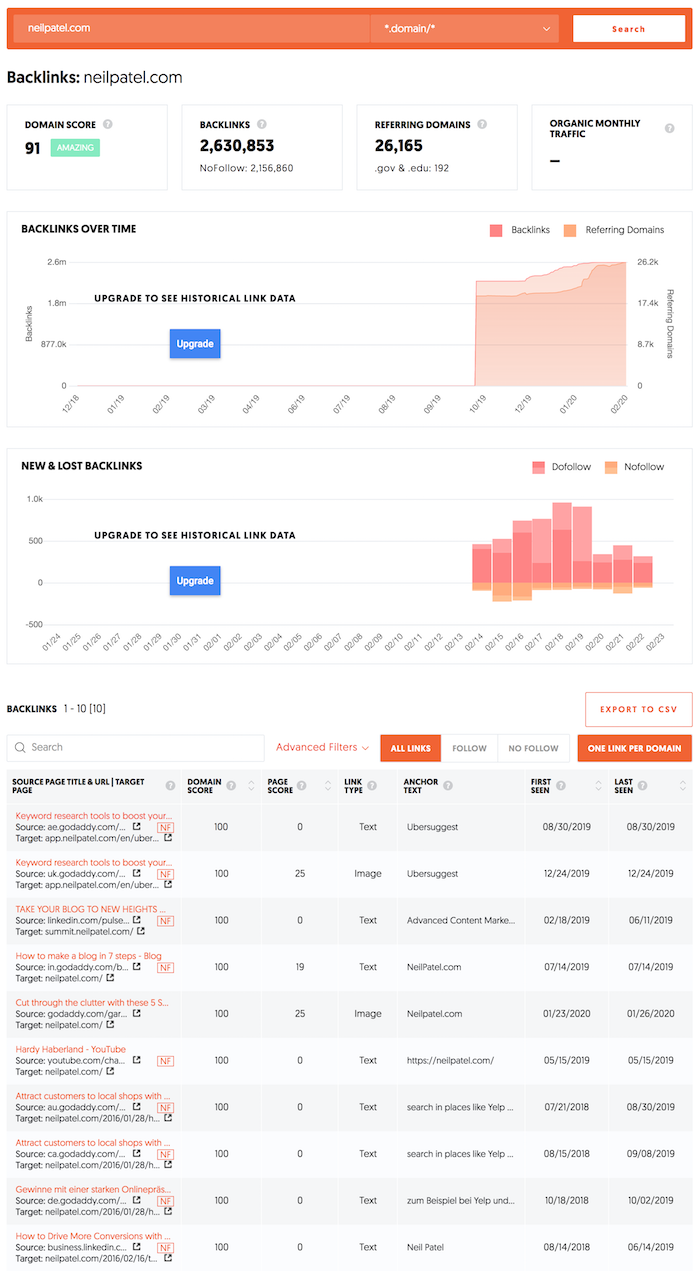
You’ll be able to see their total link count, link growth over time, and, most importantly, a list of sites linking to your competition.
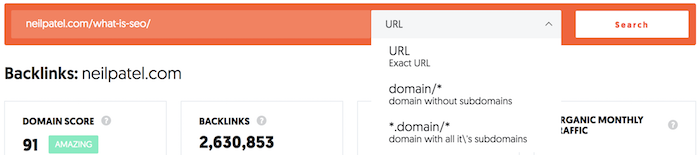
Now type in a URL of a blog post that your competition has written and that you know is popular (do this in the search bar). Next to it, in the search bar, change the drop-down to “URL” and click the “Search” button.
Once the report is done loading, you’ll see a new list of links pointing to that specific URL on your competition’s site.
I want you to do the same thing. Reach out to all of those
URLs and ask for a link as well.
When doing this, you’ll find that a lot of people will ignore you but you need to think of it as sales. You need to follow up and try to convince people. The more links you get, the higher your rankings will climb in the long run.
Even if you only convince 5 people out of 100 that you
email, it is still not bad as something is better than nothing.
Conclusion
My goal with Ubersuggest wasn’t to create too many reports, but instead, make the tool easy to use so you can generate more search traffic.
And as your rankings and traffic climb, you’ll see within your Ubersuggest dashboard how things are going.
What’s beautiful about this is that it will crawl your site automatically once you create a project. This way, when new SEO errors appear, Ubersuggest will notify you.
So, are you ready to improve your SEO traffic? Go to Ubersuggest and create a project.
The post A Step-by-Step Guide to Growing Your SEO Traffic Using Ubersuggest appeared first on Neil Patel.